
Woohoo! My graphic rug is finished! I'm lovin' how it turned out.
Awhile back, Cutting Edge Stencils asked if I wanted to do a giveaway and a product review. I said, HECK YA! Since they have a zillion of the coolest stencils ever!
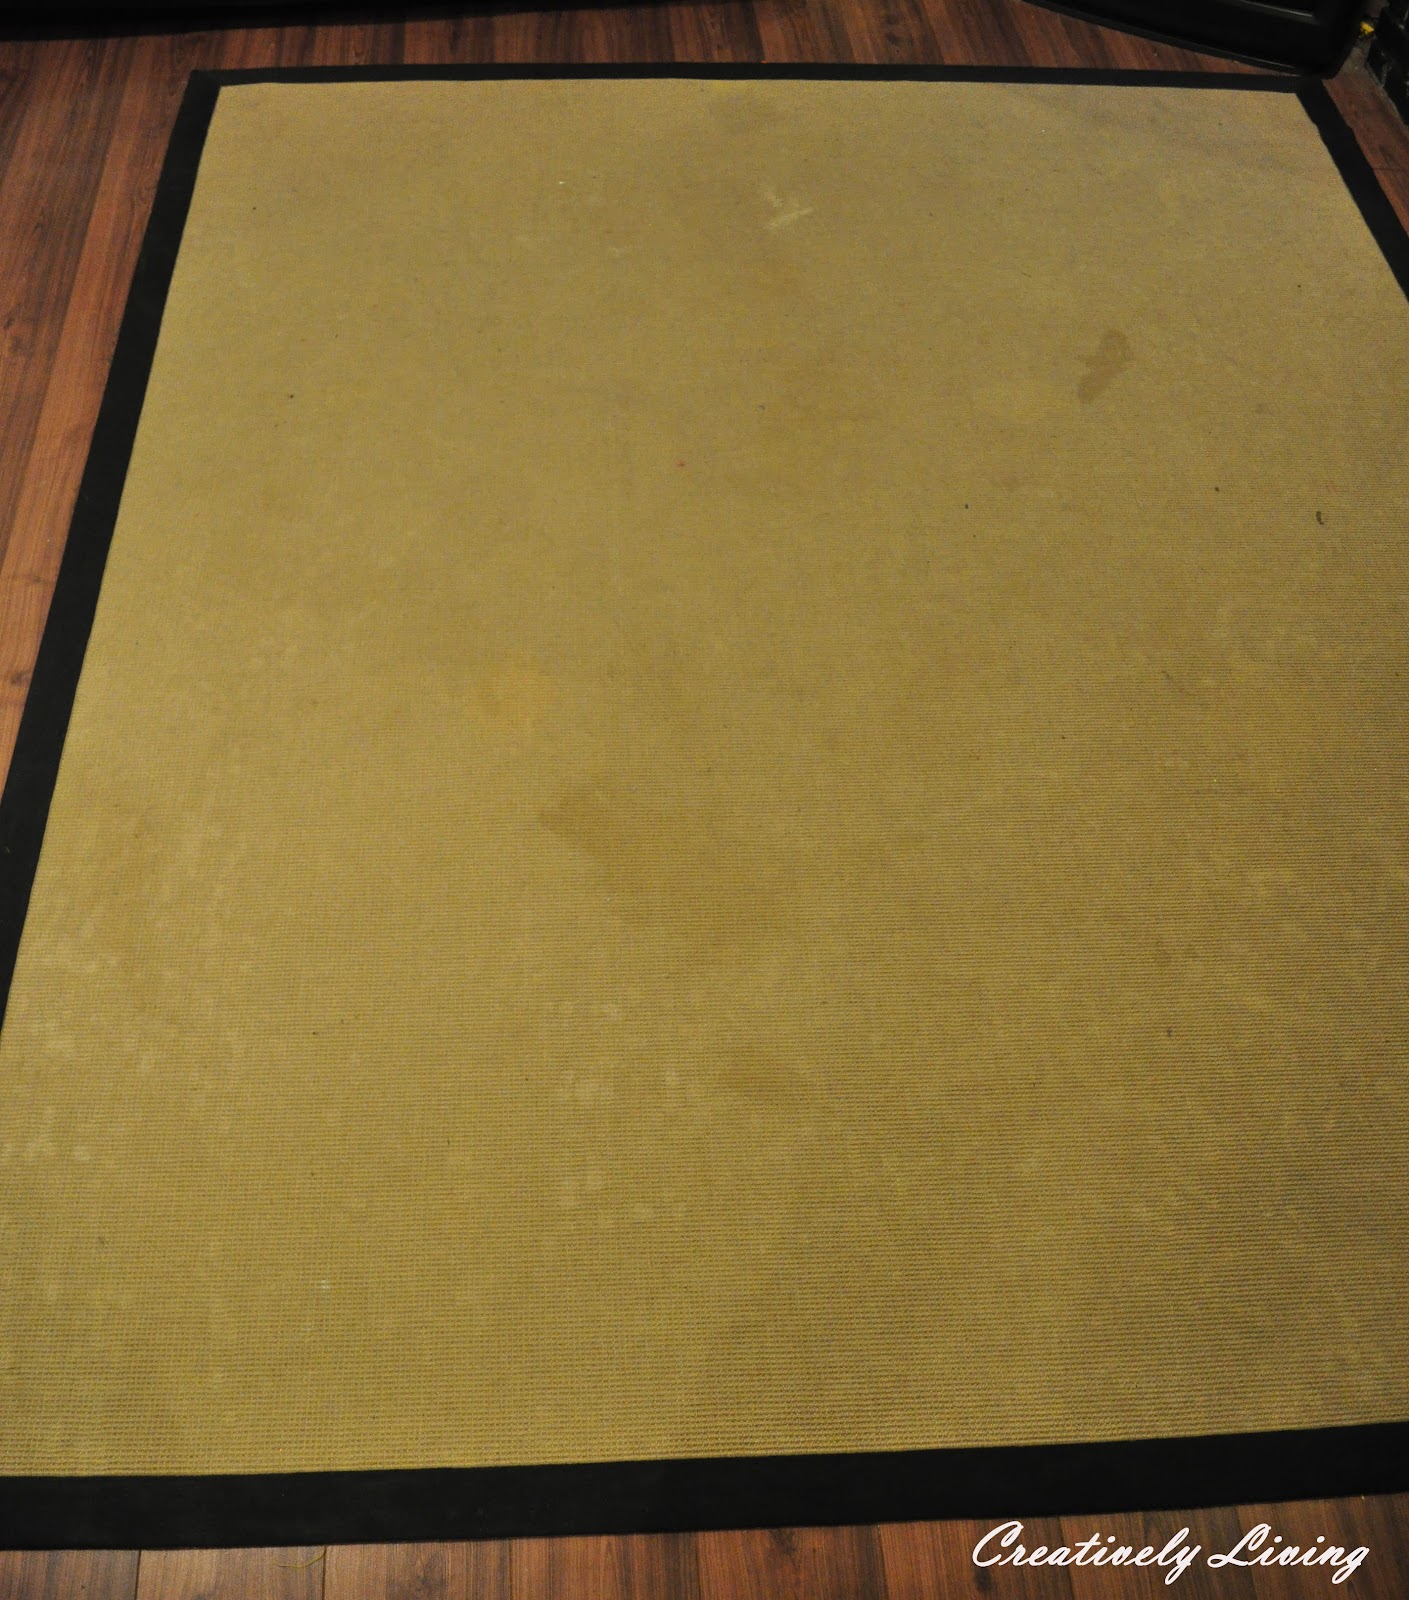
I decided to stencil this 8 x 10 rug in our basement that I was planning on getting rid of. I bought it off Craigslist about four years ago. It sits in front of our fireplace and has taken a beating! It was stained and ugly!
* Do you like everything I had to push off the rug for the picture? ....just keepin' it real!

I started by painting the boarder with latex paint from Home Depot (because they have one of the least expensive quart size paints).

I used a Purdy brush and the edges came out perfectly. Gotta love Purdy brushes!

A lot better, but still ugly!
Then, after a bit of practicing, I taped the stencil to the rug and started stenciling. I had read that when painting a berber-type rug, you should add some water, and you really should! It makes it much easier.
I also added some spray adhesive to the back of the stencil (recommended), but I don't think that makes as much of a difference on a rug, as it does on a wall.
Cutting Edge Stencils has an awesome roller brush and clip-on level they send that help make the process look professional.
Below you can see my paint, my purple water cup, the roller from Cutting Edge Stencils, and my other brush, that probably helped even more than the roller. You need a smaller stiff brush to get down in the berber.
Also, it took 3 quarts of paint. So if you're going to use the Shipibo stencil on a huge rug, you might as well just buy a gallon! I think you would need MUCH less on a wall, but the berber requires a lot.

This is how she looks now! Soooo much better! You don't notice any of the stains!

The view looking down.

Of course, this rug will end up back in front of the fireplace, but I'll put pictures of that after I re-cover my brown flowered chairs and put another coat of paint on the fireplace brick.
Do you have any old rugs? Do they need a face lift?
--Katie

This project has been featured on:


"/>


Posting to:
Mondays: The DIY Showoff Project Parade Made by You Mondays Embellishing Life Everyday Just Something I whipped up Monday The CSI project Menu Plan Monday C.R.A.F.T. The Southern Institute Making the World Cuter Thrify Décor Chick Metamorphosis Monday Sumo Sweet Stuff Gunny Sack Singing Three Little Birds DIY Homes Sweet Home Dittle Dattle1929 Charmer Everything Under the Moon ModMix Monday Sew Stylish Sew Can Do Everything Under the Moon Manic Monday Alderberry Hill
Tuesday: http://savvysouthernstyle.blogspot.com/ Blue Cricket Design Somedays Crafts Sew Much Ado Sew Woodsy Handy Man, Crafty Woman {Primp} Midweek Fiesta Rae Gun Ramblings Polkadots On Parade Petals to Picots The Southern Product Queen Sew Crafty It's Overflowing Northern Cottage Primitice and Proper Stories from A to Z Destination CraftThe Pinkatamus Gingerbread Home Happy Home Today's Creative Blog The Melrose Family Growing Home Romance on a Dime
Wednesday Blue Cricket Design Somedays Crafts Sew Much Ado Sew Woodsy Handy Man, Crafty Woman Savvy Southern Style {Primp}Midweek Fiesta Rae Gun Ramblings Polkadots On Parade Lollipop Cards JAQS Studio Let Birdz Fly Let Birdz Fly My Girlish Whims Restored it Wednesday It's Overflowing Uncommon Eye Heart Ginger Snaps and Crafts Tutus and Tea Parties Kampen Lane Designs Cheap Crafty Mama
Thursdays: Transformation Thursdays Somewhat simple Show off your stuff House of Hepworths Delightful Order My Simple Home Life The Frugal Girls Thrifty Thursday DIY Diva Thursday Tablescape Thursday No Minimalists Here Crafty, Scrappy, Happy Thrifty Decorating Between U and Me Thrifty and Fabulous Shabby Creek Cottage The Vintage FarmhouseCraftionary The Vintage Farmhouse I've Gotta Create Embracing Change Live Laugh Rowe Redoux Interios
Fridays: The Shabby nest Show and Tell Friday Finding Fabulous I’m Loving it Simply Sweet Home Whipper Berry Chic on a Shoestring decorating Spunky Junky Delicate ConstructionHomemaker in Heels Family Ever After French Country Cottage Common Ground Young And Crafty At the Picket Fence Fingerprints on the Fridge Miss Mustard Seed Addicted to Decorating Bacon Time with The Hungry Hypo Making Lemonade I Can't Stop Crafting Over the Big Moon Shabby Art Answer is Chocolate 5 Days 5 Ways Petals to Picots Country Mama Cooks Classy Clutter Hating Martha Mom 4 Real Here Comes the Sun Days of Chalk and Chocolate Remodelaholic
Saturdays: I heart nap time- Sundae Scoop Tatertots and Jello Be different Act Normal Funky Junk 2805 Making Lemonade Blog I am Along for the Ride Lolly Jane Raising Oranges The Tattered Tag Meg and Mums 6 Sister Waywayd Girls' Crafts
Sundays: Homemaker on a Dime Sunday's Best CRAFT
Friday morning

Wow, the difference from before to after is incredible, Katie! You made a tired rug look so modern and new! I don't know that I would have the patience to stencil something of this size, but all the reviews of Cutting Edge stencils certainly make them look like they are very user-friendly.
ReplyDeleteHave a great weekend!
That turned out so cool! Nice work.
ReplyDeleteWOW! That looks great! I want to stencil a rug so bad. I must find one soon. :)
ReplyDeleteLOVE! It looks fantastic!
ReplyDeleteThis is amazing! Congrats on such a successful project!
ReplyDeleteTurned out super cool! Makes such a bold and gorgeous statement in the room. Love your personalized artwork by the way.
ReplyDeleteThis is so great! Good job.
ReplyDeleteI love it. Stencilling is a lot of work but soo worth it. Great job! I pinned it!
ReplyDeleteAbsolutely gorgeous! What an incredible transformation! Loving it!!! Xx
ReplyDeleteThat is amazing! I love it! I wouldn't have ever thought to paint a rug! Just curious, how does it feel when you touch it? Does it feel stiffer where you painted? Or does it just feel like rug?
ReplyDeleteI does feel stiffer where you paint it, but since it was a berber rug it wasn't very soft to begin with.
Delete--Katie
Beautiful rescue, Katie! WOW! It's gorgeous! So funny that we were thinking along the same lines - although your rug is a much bigger more awesome statement! I love it!
ReplyDeleteThis is a pretty incredible transformation. I happen to like these kind of indoor outdoor rugs for their durability, but it's hard to find a good pattern. What a great solution and one I'd like to try for my studio.
ReplyDeleteWhat a great job you've done with this rug!! It is like night and day! I love the keeping it real picture. Megan
ReplyDeleteThat is brilliant Katie! You really turned that rug around ;)
ReplyDeleteLooks awesome!!!
ReplyDeleteThat looks A-MAZING!! I love the room too! Very cute! I'm a new follower. :) Stop by my blog sometime. :) http://www.thelittlegiggler.com
ReplyDeleteThis is stunning! From your pictures, I could have sworn that you purchased that rug as-is!
ReplyDeleteThis is completely stunning Katie! I have an old stained sisal rug sitting downstairs that I was considering painting. This has turned out so amazing I will have to try it now! xx
ReplyDeleteAnna (My Design Ethos)
This looks amazing! Love the stencil you picked out!
ReplyDeleteI did the same thing with a cutting edge stencil. I love my new rug and it cost me only $10! What an awesome transformation.
ReplyDeleteI went over and saw it! It turned out beautifully! I think stenciled rugs are the way to go from here on out! :) Thanks for stopping by.
Delete--Katie
Love lOve loVe lovE! Bythewayjenngray.blogspot.com
ReplyDeleteWow! What a difference, great job.
ReplyDeleteYou could not have picked a better stencil pattern for that rug. I love the way it turned out!
ReplyDeleteTami @ Curb Alert!
You've got to be kidding me! This looks awesome, Katie!!!
ReplyDeleteThat looks soooooo pretty!! I love it!
ReplyDeleteWow - your rug is awesome. I love it!!
ReplyDeleteI featured it on my TT&J FB page :)
xoxoxo
Thanks Jen! Happy Sunday!
Delete--Katie
Brilliant idea! I am surprised by how much paint it took, but it was so worth it. It looks like a brand new rug.
ReplyDeleteAmazing job!
ReplyDeleteBeautiful job!!! Love your stencil pattern & what a gorgeous rug you now have! Also I just love your art work! Did you make this?! Blessings!
ReplyDeleteOh my gosh - that is soooooo impressive! It looks like you paid big bucks for it!
ReplyDeleteLooks so much better. I've been wanting to paint a rug but haven't worked up the nerve.
ReplyDeleteI love it! Turned out great, great job!
ReplyDeleteThanks for the tips and the inspiration....Can't wait to give it a try...I have the perfect rug.
ReplyDeleteWow! Looks amazing~
ReplyDeleteI absolutely LOVE what you have done with your rug! I have a question regarding using spray adhesive, Doesn't it leave behind a sticky mess?
ReplyDeleteI wondered about that too, because when I've used it before, it created a dirty, sticky mess, but since it was recommended, and others had used it while stenciling material, I tried it. I sprayed it on the stencil, not the rug, (but I can see how it could still possibly make the rug sticky). I
Deletedidn't notice any stickiness and there aren't any dirty spots. I didn't try the spray adhesive for that long, because it didn't really seem to help much with the berber.
--Katie
Your rug is absolutely stunning and such an eye catcher! I love the design! I would love for you to share this with my Unveil Your Genius Link Party (new linky every Thursday).
ReplyDeletehttp://taylornorris.blogspot.com/2012/05/unveil-your-genius-link-party-9.html
Happy Sunday!
I adore this rug! What a great look and easy tutorial! Actually, I love the entire room, the paneling is gorgeous! I'm co-hosting the link party with Lines Across and I would love it if you would stop by and share, if you haven't already! Hope to see you there!
ReplyDeletehttp://chase-thestar.blogspot.com/2012/05/co-hosting-cure-for-common-monday-linky.html
Barbara @ Chase the Star
...also following you now via GFC! :)
DeleteI am dying over here! I love love love the rug. It looks amazing! Great job! I am definitely entering the giveaway!
ReplyDeleteThat rug is HOT. :)
ReplyDeleteThat is Amazing, Katie!!! I love it!
ReplyDeleteThis looks great! Love the black and tan!
ReplyDeleteAmazing! I want that rug.....
ReplyDeleteThis is such a great project! The stencil looks amazing! I would love to have that rug in my house. Would you consider linking it up to my Pinworthy Projects Party? I'd love to have you join the party.
ReplyDeleteI just missed it, but I follow you now, so I should see the next party :)
Delete--Katie
That is just crazy cool! I don't think I'd have the patience for a big rug, but I might try a smaller one!
ReplyDeleteWow! That really looks amazing! Like a brand new rug. Love the graphic!
ReplyDeleteWOW! I'm so impressed...you really turned trash into treasure. Great job.
ReplyDeletethat looks amazing!
ReplyDeleteThis turned out fabulous!
ReplyDeleteWOW!!!!!!!!!!!!!!!!! I can't believe you stenciled that entire rug!!! It looks FANTASTIC!!!!!!!!!!!
ReplyDeleteKatie - nice job! I am wondering about cleaning a stenciled rug or how the latex paint will hold up if the rug gets wet? I was thinking of stenciling a couple of rugs, one for my back deck (Target has large, plain indoor/outdoor rugs for 19.99 which would be awesome stenciled). Do you think the paint would run if it got wet? How about cleaning an indoor stenciled rug? What products would you recommend? Thanks for your help :)
ReplyDeleteCyndi
From other experiences with latex on material, I don't think it would run if it got wet. However, I would be worried about scrubbing or steam cleaning it. I'm glad the colors are black and tan, because both hide dirt and stains well :)
DeleteGreat question.
--Katie
I can't believe you made this! It looks really expensive. I'm a new blog follower from a Tuesday blog hop, I would love if you followed me back at www.iheartpears.blogspot.com
ReplyDeleteCute site! I'm following you now :)
Delete--Katie
This rug transformation is absolutely gorgeous!!! I love the pattern and it looks brand new and elegant. Excellent job!!!!!
ReplyDeleteRuth
Wow! That is amazing! It looks brand new and very cool!
ReplyDeleteOh my Geez! Really!?! That looks like something you'd buy for $$$$$ at a home decor store! I threw away a rug with a border not too long ago because I wasn't a genius like you to come up with something this awesome!! lol!
ReplyDeleteIt looks amazing!!
ReplyDeleteAre you kidding me?????? AMAZING!!! Pinning and Facebooking this!!
ReplyDeleteTotally blown away! I can not believe how awesome this is!
xo-Lisa
Thanks Lisa! I am happy with the outcome and the price was right :)
Delete--Katie
That looks fabulous!! I would love for you to share this (and any other creations) at Pin It and Win It Wednesday at www.cheapcraftymama.com-- where you can win free ad-space on my blog!
ReplyDeleteI linked it up and am now following you on FB!
DeleteThanks for stopping by!
--Katie @ Creatively Living
This looks amazing! Thanks for linking up at Well Crafted Wednesdays!
ReplyDeleteYou're going to be featured tomorrow!
ReplyDeletewww.raisingoranges.blogspot.com
Thanks Katie!
DeleteGOOD GRIEF !!! What a project. And, it looks amazing. Great job.
ReplyDeleteIm now following you, so please come visit me at PICKINandPAINTIN.blogspot.com and maybe you'll decide to follow back. THANKS.
I will be by later tonight Candy!
DeleteThanks for stopping by!
--Katie
That is amazing!!!
ReplyDeleteThat came out amazing! Thanks for the class....
ReplyDeleteI LOVE it!!! It pulls the whole room together. P.S. I adore that family drawing on the wall :)
ReplyDeleteWow - great job! It looks really good and much better with this makeover!! I'm pinning this. Thanks for linking up at Romance on a Dime!!
ReplyDeleteI love how it turned out! It is a great improvement over the "before" picture!
ReplyDeleteWOW! Amazing work :)
ReplyDeleteMrs. Delightful
www.ourdelightfulhome.blogspot.com
Absolutely amazing! The rug has another life in it yet! Great work!
ReplyDeleteBeyond amazing, the rug is beautiful. such a great improvement and great that you recyled!!! Thanks for sharing your creative inspiration over at Sunday's Best!
ReplyDeleteWOW...All I can say is WOW!
ReplyDeleteGotta love a gal with a paintbrush!
ReplyDeleteWow that turned out so good, How long did it take you to do all of that?
ReplyDeleteA long time! lol I would just go down after the kids went to bed and stencil one part, then wait about 20 minutes for it to dry, and stencil another. I was afraid to do it while the kids were awake. I was pretty sure they would leave a big black footprint on it! So really, all the time added together wasn't bad...it was just that it took a lot of nights.
Delete--Katie
Wow! Your rug looks amazing and brand new.
ReplyDeleteDee
That is a jaw-dropping amazing transformation! Wow!!! Thanks so much for linking up at I Gotta Create! <3 Christina
ReplyDeleteThis roug looks so professional as if it was purchased at a fancy decor store, very well done, easy to do, few steps and yet amazing result. It is a brilliant idea.
ReplyDeleteWhat a transformation, it looks great!
ReplyDeleteShut UP! This is awesome, Katie!
ReplyDeleteFeaturing you today! : )
Stunning who would have thought :) Amazing!
ReplyDeleteThis looks crazy awesome! I never would have thought that rig had another life in it {no offense}. But it looks brand spankin new and so, so great!! Love!
ReplyDeletexo Becca
Turned out FABULOUS! This is totally on my "to do" list! Makes me excited seeing how great your rug turned out! I'm featuring you tomorrow! XO, Aimee
ReplyDeleteKatie you must be hearing a lot, but it is awesome! Really, now that I've read your post I'm looking around for a rug to paint or stencil! Just a question, how much time does it take to get completely dry so that you can step on it? Congrats on the many features as well!
ReplyDeleteYou seriously need to write a book! This is so so so so stunning! WIshing you a very happy Mother's Day!
ReplyDeleteCarol, your comments always make me feel good. Thanks!
DeleteEnjoy your Saturday!
--Katie
Thank you so much for the instructions...
ReplyDeleteI have a rug that needs help and I'm doing
it as soon as possible..I had no idea what
paint to use.. so helpful to say the least!
Thank you
Sandy
So glad to see this project! I just switched out my living room rug. I had one very similar in color and style to yours. It was feeling blah. I thought about stenciling it but was afraid it wouldn't be comfortable to walk on. What does it feel like once it's painted? Yours looks so chic, by the way!
ReplyDeleteFeels just fine. It's berber, so it's not super cozy to begin with, but I think the paint doesn't make much of a difference to my feet.
DeleteHope that helps :)
--Katie
Gorgeous makeover. Thanks for sharing at wow.
ReplyDeleteRug??? I can't keep my eyes off of that great stick figure family pic in the background!!!! Love it!
ReplyDeleteThank you. My 6 yr old drew it for me :)
Delete--Katie
LOVE LOVE LOVE your rug. THis seriously looks like its worth $500+ bucks. Never in a million years would I have known you stenciled it if you hadn't told me. LOVE this and that's why I'm featuring it tomorrow on Sew Woodsy!
ReplyDeleteThank you Katie!
DeleteThis looks amazing Katie!
ReplyDeleteWOW!
Great job and a nice tutorial :o)
Featuring you this week!
Stacey of Embracing Change
Thank you Stacey!
DeleteThank you for linking up to my Tuesday Confessional link party. I've featured your post, so head on over and grab a brag button!
ReplyDeletehttp://www.craftyconfessions.com/2012/05/features-from-last-weeks-tuesday.html
~Macy
Beautiful!! I am beyond impressed! It fit perfectly in your room with your amazing gallery wall. Thanks so much for sharing with us at Link It UP Thursday.
ReplyDeleteAmazing work. Great pattern choice. That rug really pops now. :)
ReplyDeleteThat is amazing. You just gave me an idea for a tired boardered rug. I pinned it.
ReplyDeleteLove the stenciled rug, but REALLY love the large print on the wall with your family name. Awesome!!
ReplyDeleteThat turned out so cool! Nice work.
ReplyDelete